04_GIT
1. Fitnessstudio
Erstellen Sie ein neues Repository auf github.com mit
dem Namen nachname_training_checkgit.
Verwenden Sie Ihren NACHNAMEN!
Legen Sie die Klasse Training an:
┏━━━━━━━━━━━━━━━━━━━━━━━━━━━━━━┓
┃           Training           ┃
┣━━━━━━━━━━━━━━━━━━━━━━━━━━━━━━┫
┃ - dauer: int                 ┃
┃ - bezeichnung: String        ┃
┃ - trainer: String            ┃
┣━━━━━━━━━━━━━━━━━━━━━━━━━━━━━━┫
┃ + ...                        ┃
┗━━━━━━━━━━━━━━━━━━━━━━━━━━━━━━┛- Erstellen Sie einen Konflikt und lösen Sie diesen.
- Erstellen Sie mehrere Branches und führen Sie diese
wieder in
mainzusammen.
Erstellen Sie ein weiteres neues Repository auf
github.com mit dem Namen
nachname_training.
Verwenden Sie Ihren NACHNAMEN!
- Laden Sie die letzte Version Collection auf
github.comhoch.
2. Sprachschule
Erstellen Sie ein neues Repository auf github.com mit
dem Namen nachname_sprachkurs_checkgit.
Verwenden Sie Ihren NACHNAMEN!
Legen Sie die Klasse SprachKurs an:
┏━━━━━━━━━━━━━━━━━━━━━━━━━━━━━━┓
┃          SprachKurs          ┃
┣━━━━━━━━━━━━━━━━━━━━━━━━━━━━━━┫
┃ - stunden: int               ┃
┃ - sprache: String            ┃
┃ - lehrkraft: String          ┃
┣━━━━━━━━━━━━━━━━━━━━━━━━━━━━━━┫
┃ + ...                        ┃
┗━━━━━━━━━━━━━━━━━━━━━━━━━━━━━━┛- Erstellen Sie einen Konflikt und lösen Sie diesen.
- Erstellen Sie mehrere Branches und führen Sie diese
wieder in
mainzusammen.
Erstellen Sie ein weiteres neues Repository auf
github.com mit dem Namen
nachname_sprachkurs.
Verwenden Sie Ihren NACHNAMEN!
- Laden Sie die letzte Version Collection auf
github.comhoch.
3. Hotel
Erstellen Sie ein neues Repository auf github.com mit
dem Namen nachname_buchung_checkgit.
Verwenden Sie Ihren NACHNAMEN!
Legen Sie die Klasse Buchung an:
┏━━━━━━━━━━━━━━━━━━━━━━━━━━━━━━┓
┃           Buchung            ┃
┣━━━━━━━━━━━━━━━━━━━━━━━━━━━━━━┫
┃ - naechte: int               ┃
┃ - gast: String               ┃
┃ - zimmer: String             ┃
┣━━━━━━━━━━━━━━━━━━━━━━━━━━━━━━┫
┃ + ...                        ┃
┗━━━━━━━━━━━━━━━━━━━━━━━━━━━━━━┛- Erstellen Sie einen Konflikt und lösen Sie diesen.
- Erstellen Sie mehrere Branches und führen Sie diese
wieder in
mainzusammen.
Erstellen Sie ein weiteres neues Repository auf
github.com mit dem Namen nachname_buchung.
Verwenden Sie Ihren NACHNAMEN!
- Laden Sie die letzte Version Collection auf
github.comhoch.
4. Autovermietung
Erstellen Sie ein neues Repository auf github.com mit
dem Namen nachname_miete_checkgit.
Verwenden Sie Ihren NACHNAMEN!
Legen Sie die Klasse Miete an:
┏━━━━━━━━━━━━━━━━━━━━━━━━━━━━━━┓
┃            Miete             ┃
┣━━━━━━━━━━━━━━━━━━━━━━━━━━━━━━┫
┃ - tage: int                  ┃
┃ - fahrzeug: String           ┃
┃ - kunde: String              ┃
┣━━━━━━━━━━━━━━━━━━━━━━━━━━━━━━┫
┃ + ...                        ┃
┗━━━━━━━━━━━━━━━━━━━━━━━━━━━━━━┛- Erstellen Sie einen Konflikt und lösen Sie diesen.
- Erstellen Sie mehrere Branches und führen Sie diese
wieder in
mainzusammen.
Erstellen Sie ein weiteres neues Repository auf
github.com mit dem Namen nachname_miete.
Verwenden Sie Ihren NACHNAMEN!
- Laden Sie die letzte Version Collection auf
github.comhoch.
5. Musikschule
Erstellen Sie ein neues Repository auf github.com mit
dem Namen nachname_musikunterricht_checkgit.
Verwenden Sie Ihren NACHNAMEN!
Legen Sie die Klasse MusikUnterricht an:
┏━━━━━━━━━━━━━━━━━━━━━━━━━━━━━━┓
┃       MusikUnterricht        ┃
┣━━━━━━━━━━━━━━━━━━━━━━━━━━━━━━┫
┃ - einheiten: int             ┃
┃ - instrument: String         ┃
┃ - lehrkraft: String          ┃
┣━━━━━━━━━━━━━━━━━━━━━━━━━━━━━━┫
┃ + ...                        ┃
┗━━━━━━━━━━━━━━━━━━━━━━━━━━━━━━┛- Erstellen Sie einen Konflikt und lösen Sie diesen.
- Erstellen Sie mehrere Branches und führen Sie diese
wieder in
mainzusammen.
Erstellen Sie ein weiteres neues Repository auf
github.com mit dem Namen
nachname_musikunterricht.
Verwenden Sie Ihren NACHNAMEN!
- Laden Sie die letzte Version Collection auf
github.comhoch.
6. Nachhilfeinstitut
Erstellen Sie ein neues Repository auf github.com mit
dem Namen nachname_nachhilfe_checkgit.
Verwenden Sie Ihren NACHNAMEN!
Legen Sie die Klasse Nachhilfe an:
┏━━━━━━━━━━━━━━━━━━━━━━━━━━━━━━┓
┃          Nachhilfe           ┃
┣━━━━━━━━━━━━━━━━━━━━━━━━━━━━━━┫
┃ - stunden: int               ┃
┃ - fach: String               ┃
┃ - lehrer: String             ┃
┣━━━━━━━━━━━━━━━━━━━━━━━━━━━━━━┫
┃ + ...                        ┃
┗━━━━━━━━━━━━━━━━━━━━━━━━━━━━━━┛- Erstellen Sie einen Konflikt und lösen Sie diesen.
- Erstellen Sie mehrere Branches und führen Sie diese
wieder in
mainzusammen.
Erstellen Sie ein weiteres neues Repository auf
github.com mit dem Namen
nachname_nachhilfe.
Verwenden Sie Ihren NACHNAMEN!
- Laden Sie die letzte Version Collection auf
github.comhoch.
7. Parkplatz
Erstellen Sie ein neues Repository auf github.com mit
dem Namen nachname_parkvorgang_checkgit.
Verwenden Sie Ihren NACHNAMEN!
Legen Sie die Klasse ParkVorgang an:
┏━━━━━━━━━━━━━━━━━━━━━━━━━━━━━━┓
┃         ParkVorgang          ┃
┣━━━━━━━━━━━━━━━━━━━━━━━━━━━━━━┫
┃ - stunden: int               ┃
┃ - kennzeichen: String        ┃
┃ - parkplatz: String          ┃
┣━━━━━━━━━━━━━━━━━━━━━━━━━━━━━━┫
┃ + ...                        ┃
┗━━━━━━━━━━━━━━━━━━━━━━━━━━━━━━┛- Erstellen Sie einen Konflikt und lösen Sie diesen.
- Erstellen Sie mehrere Branches und führen Sie diese
wieder in
mainzusammen.
Erstellen Sie ein weiteres neues Repository auf
github.com mit dem Namen
nachname_parkvorgang.
Verwenden Sie Ihren NACHNAMEN!
- Laden Sie die letzte Version Collection auf
github.comhoch.
8. Fahrradverleih
Erstellen Sie ein neues Repository auf github.com mit
dem Namen nachname_fahrradmiete_checkgit.
Verwenden Sie Ihren NACHNAMEN!
Legen Sie die Klasse FahrradMiete an:
┏━━━━━━━━━━━━━━━━━━━━━━━━━━━━━━┓
┃         FahrradMiete         ┃
┣━━━━━━━━━━━━━━━━━━━━━━━━━━━━━━┫
┃ - stunden: int               ┃
┃ - fahrrad: String            ┃
┃ - kunde: String              ┃
┣━━━━━━━━━━━━━━━━━━━━━━━━━━━━━━┫
┃ + ...                        ┃
┗━━━━━━━━━━━━━━━━━━━━━━━━━━━━━━┛- Erstellen Sie einen Konflikt und lösen Sie diesen.
- Erstellen Sie mehrere Branches und führen Sie diese
wieder in
mainzusammen.
Erstellen Sie ein weiteres neues Repository auf
github.com mit dem Namen
nachname_fahrradmiete.
Verwenden Sie Ihren NACHNAMEN!
- Laden Sie die letzte Version Collection auf
github.comhoch.
9. Kino
Erstellen Sie ein neues Repository auf github.com mit
dem Namen nachname_vorstellung_checkgit.
Verwenden Sie Ihren NACHNAMEN!
Legen Sie die Klasse Vorstellung an:
┏━━━━━━━━━━━━━━━━━━━━━━━━━━━━━━┓
┃         Vorstellung          ┃
┣━━━━━━━━━━━━━━━━━━━━━━━━━━━━━━┫
┃ - tickets: int               ┃
┃ - film: String               ┃
┃ - saal: String               ┃
┣━━━━━━━━━━━━━━━━━━━━━━━━━━━━━━┫
┃ + ...                        ┃
┗━━━━━━━━━━━━━━━━━━━━━━━━━━━━━━┛- Erstellen Sie einen Konflikt und lösen Sie diesen.
- Erstellen Sie mehrere Branches und führen Sie diese
wieder in
mainzusammen.
Erstellen Sie ein weiteres neues Repository auf
github.com mit dem Namen
nachname_vorstellung.
Verwenden Sie Ihren NACHNAMEN!
- Laden Sie die letzte Version Collection auf
github.comhoch.
10. Museum
Erstellen Sie ein neues Repository auf github.com mit
dem Namen nachname_fuehrung_checkgit.
Verwenden Sie Ihren NACHNAMEN!
Legen Sie die Klasse Fuehrung an:
┏━━━━━━━━━━━━━━━━━━━━━━━━━━━━━━┓
┃           Fuehrung           ┃
┣━━━━━━━━━━━━━━━━━━━━━━━━━━━━━━┫
┃ - teilnehmer: int            ┃
┃ - thema: String              ┃
┃ - guide: String              ┃
┣━━━━━━━━━━━━━━━━━━━━━━━━━━━━━━┫
┃ + ...                        ┃
┗━━━━━━━━━━━━━━━━━━━━━━━━━━━━━━┛- Erstellen Sie einen Konflikt und lösen Sie diesen.
- Erstellen Sie mehrere Branches und führen Sie diese
wieder in
mainzusammen.
Erstellen Sie ein weiteres neues Repository auf
github.com mit dem Namen
nachname_fuehrung.
Verwenden Sie Ihren NACHNAMEN!
- Laden Sie die letzte Version Collection auf
github.comhoch.
11. Schwimmschule
Erstellen Sie ein neues Repository auf github.com mit
dem Namen nachname_schwimmkurs_checkgit.
Verwenden Sie Ihren NACHNAMEN!
Legen Sie die Klasse SchwimmKurs an:
┏━━━━━━━━━━━━━━━━━━━━━━━━━━━━━━┓
┃         SchwimmKurs          ┃
┣━━━━━━━━━━━━━━━━━━━━━━━━━━━━━━┫
┃ - einheiten: int             ┃
┃ - niveau: String             ┃
┃ - trainer: String            ┃
┣━━━━━━━━━━━━━━━━━━━━━━━━━━━━━━┫
┃ + ...                        ┃
┗━━━━━━━━━━━━━━━━━━━━━━━━━━━━━━┛- Erstellen Sie einen Konflikt und lösen Sie diesen.
- Erstellen Sie mehrere Branches und führen Sie diese
wieder in
mainzusammen.
Erstellen Sie ein weiteres neues Repository auf
github.com mit dem Namen
nachname_schwimmkurs.
Verwenden Sie Ihren NACHNAMEN!
- Laden Sie die letzte Version Collection auf
github.comhoch.
12. Skischule
Erstellen Sie ein neues Repository auf github.com mit
dem Namen nachname_skikurs_checkgit.
Verwenden Sie Ihren NACHNAMEN!
Legen Sie die Klasse SkiKurs an:
┏━━━━━━━━━━━━━━━━━━━━━━━━━━━━━━┓
┃           SkiKurs            ┃
┣━━━━━━━━━━━━━━━━━━━━━━━━━━━━━━┫
┃ - stunden: int               ┃
┃ - niveau: String             ┃
┃ - skiLehrer: String          ┃
┣━━━━━━━━━━━━━━━━━━━━━━━━━━━━━━┫
┃ + ...                        ┃
┗━━━━━━━━━━━━━━━━━━━━━━━━━━━━━━┛- Erstellen Sie einen Konflikt und lösen Sie diesen.
- Erstellen Sie mehrere Branches und führen Sie diese
wieder in
mainzusammen.
Erstellen Sie ein weiteres neues Repository auf
github.com mit dem Namen nachname_skikurs.
Verwenden Sie Ihren NACHNAMEN!
- Laden Sie die letzte Version Collection auf
github.comhoch.
13. Fotostudio
Erstellen Sie ein neues Repository auf github.com mit
dem Namen nachname_shooting_checkgit.
Verwenden Sie Ihren NACHNAMEN!
Legen Sie die Klasse Shooting an:
┏━━━━━━━━━━━━━━━━━━━━━━━━━━━━━━┓
┃           Shooting           ┃
┣━━━━━━━━━━━━━━━━━━━━━━━━━━━━━━┫
┃ - stunden: int               ┃
┃ - kunde: String              ┃
┃ - fotograf: String           ┃
┣━━━━━━━━━━━━━━━━━━━━━━━━━━━━━━┫
┃ + ...                        ┃
┗━━━━━━━━━━━━━━━━━━━━━━━━━━━━━━┛- Erstellen Sie einen Konflikt und lösen Sie diesen.
- Erstellen Sie mehrere Branches und führen Sie diese
wieder in
mainzusammen.
Erstellen Sie ein weiteres neues Repository auf
github.com mit dem Namen
nachname_shooting.
Verwenden Sie Ihren NACHNAMEN!
- Laden Sie die letzte Version Collection auf
github.comhoch.
14. Reinigungsfirma
Erstellen Sie ein neues Repository auf github.com mit
dem Namen nachname_reinigung_checkgit.
Verwenden Sie Ihren NACHNAMEN!
Legen Sie die Klasse Reinigung an:
┏━━━━━━━━━━━━━━━━━━━━━━━━━━━━━━┓
┃          Reinigung           ┃
┣━━━━━━━━━━━━━━━━━━━━━━━━━━━━━━┫
┃ - stunden: int               ┃
┃ - objekt: String             ┃
┃ - firma: String              ┃
┣━━━━━━━━━━━━━━━━━━━━━━━━━━━━━━┫
┃ + ...                        ┃
┗━━━━━━━━━━━━━━━━━━━━━━━━━━━━━━┛- Erstellen Sie einen Konflikt und lösen Sie diesen.
- Erstellen Sie mehrere Branches und führen Sie diese
wieder in
mainzusammen.
Erstellen Sie ein weiteres neues Repository auf
github.com mit dem Namen
nachname_reinigung.
Verwenden Sie Ihren NACHNAMEN!
- Laden Sie die letzte Version Collection auf
github.comhoch.
15. Lieferdienst
Erstellen Sie ein neues Repository auf github.com mit
dem Namen nachname_lieferung_checkgit.
Verwenden Sie Ihren NACHNAMEN!
Legen Sie die Klasse Lieferung an:
┏━━━━━━━━━━━━━━━━━━━━━━━━━━━━━━┓
┃          Lieferung           ┃
┣━━━━━━━━━━━━━━━━━━━━━━━━━━━━━━┫
┃ - kilometer: int             ┃
┃ - ziel: String               ┃
┃ - fahrer: String             ┃
┣━━━━━━━━━━━━━━━━━━━━━━━━━━━━━━┫
┃ + ...                        ┃
┗━━━━━━━━━━━━━━━━━━━━━━━━━━━━━━┛- Erstellen Sie einen Konflikt und lösen Sie diesen.
- Erstellen Sie mehrere Branches und führen Sie diese
wieder in
mainzusammen.
Erstellen Sie ein weiteres neues Repository auf
github.com mit dem Namen
nachname_lieferung.
Verwenden Sie Ihren NACHNAMEN!
- Laden Sie die letzte Version Collection auf
github.comhoch.
16. Taxiunternehmen
Erstellen Sie ein neues Repository auf github.com mit
dem Namen nachname_fahrt_checkgit.
Verwenden Sie Ihren NACHNAMEN!
Legen Sie die Klasse Fahrt an:
┏━━━━━━━━━━━━━━━━━━━━━━━━━━━━━━┓
┃            Fahrt             ┃
┣━━━━━━━━━━━━━━━━━━━━━━━━━━━━━━┫
┃ - kilometer: int             ┃
┃ - start: String              ┃
┃ - ziel: String               ┃
┣━━━━━━━━━━━━━━━━━━━━━━━━━━━━━━┫
┃ + ...                        ┃
┗━━━━━━━━━━━━━━━━━━━━━━━━━━━━━━┛- Erstellen Sie einen Konflikt und lösen Sie diesen.
- Erstellen Sie mehrere Branches und führen Sie diese
wieder in
mainzusammen.
Erstellen Sie ein weiteres neues Repository auf
github.com mit dem Namen nachname_fahrt.
Verwenden Sie Ihren NACHNAMEN!
- Laden Sie die letzte Version Collection auf
github.comhoch.
17. Paketdienst
Erstellen Sie ein neues Repository auf github.com mit
dem Namen nachname_versand_checkgit.
Verwenden Sie Ihren NACHNAMEN!
Legen Sie die Klasse Versand an:
┏━━━━━━━━━━━━━━━━━━━━━━━━━━━━━━┓
┃           Versand            ┃
┣━━━━━━━━━━━━━━━━━━━━━━━━━━━━━━┫
┃ - gewicht: int               ┃
┃ - empfaenger: String         ┃
┃ - land: String               ┃
┣━━━━━━━━━━━━━━━━━━━━━━━━━━━━━━┫
┃ + ...                        ┃
┗━━━━━━━━━━━━━━━━━━━━━━━━━━━━━━┛- Erstellen Sie einen Konflikt und lösen Sie diesen.
- Erstellen Sie mehrere Branches und führen Sie diese
wieder in
mainzusammen.
Erstellen Sie ein weiteres neues Repository auf
github.com mit dem Namen nachname_versand.
Verwenden Sie Ihren NACHNAMEN!
- Laden Sie die letzte Version Collection auf
github.comhoch.
18. Campingplatz
Erstellen Sie ein neues Repository auf github.com mit
dem Namen nachname_aufenthalt_checkgit.
Verwenden Sie Ihren NACHNAMEN!
Legen Sie die Klasse Aufenthalt an:
┏━━━━━━━━━━━━━━━━━━━━━━━━━━━━━━┓
┃          Aufenthalt          ┃
┣━━━━━━━━━━━━━━━━━━━━━━━━━━━━━━┫
┃ - naechte: int               ┃
┃ - gast: String               ┃
┃ - platz: String              ┃
┣━━━━━━━━━━━━━━━━━━━━━━━━━━━━━━┫
┃ + ...                        ┃
┗━━━━━━━━━━━━━━━━━━━━━━━━━━━━━━┛- Erstellen Sie einen Konflikt und lösen Sie diesen.
- Erstellen Sie mehrere Branches und führen Sie diese
wieder in
mainzusammen.
Erstellen Sie ein weiteres neues Repository auf
github.com mit dem Namen
nachname_aufenthalt.
Verwenden Sie Ihren NACHNAMEN!
- Laden Sie die letzte Version Collection auf
github.comhoch.
19. Hundeschule
Erstellen Sie ein neues Repository auf github.com mit
dem Namen nachname_hundetraining_checkgit.
Verwenden Sie Ihren NACHNAMEN!
Legen Sie die Klasse HundeTraining an:
┏━━━━━━━━━━━━━━━━━━━━━━━━━━━━━━┓
┃        HundeTraining         ┃
┣━━━━━━━━━━━━━━━━━━━━━━━━━━━━━━┫
┃ - einheiten: int             ┃
┃ - hund: String               ┃
┃ - trainer: String            ┃
┣━━━━━━━━━━━━━━━━━━━━━━━━━━━━━━┫
┃ + ...                        ┃
┗━━━━━━━━━━━━━━━━━━━━━━━━━━━━━━┛- Erstellen Sie einen Konflikt und lösen Sie diesen.
- Erstellen Sie mehrere Branches und führen Sie diese
wieder in
mainzusammen.
Erstellen Sie ein weiteres neues Repository auf
github.com mit dem Namen
nachname_hundetraining.
Verwenden Sie Ihren NACHNAMEN!
- Laden Sie die letzte Version Collection auf
github.comhoch.
20. Reitschule
Erstellen Sie ein neues Repository auf github.com mit
dem Namen nachname_reitkurs_checkgit.
Verwenden Sie Ihren NACHNAMEN!
Legen Sie die Klasse ReitKurs an:
┏━━━━━━━━━━━━━━━━━━━━━━━━━━━━━━┓
┃           ReitKurs           ┃
┣━━━━━━━━━━━━━━━━━━━━━━━━━━━━━━┫
┃ - einheiten: int             ┃
┃ - schueler: String           ┃
┃ - pferd: String              ┃
┣━━━━━━━━━━━━━━━━━━━━━━━━━━━━━━┫
┃ + ...                        ┃
┗━━━━━━━━━━━━━━━━━━━━━━━━━━━━━━┛- Erstellen Sie einen Konflikt und lösen Sie diesen.
- Erstellen Sie mehrere Branches und führen Sie diese
wieder in
mainzusammen.
Erstellen Sie ein weiteres neues Repository auf
github.com mit dem Namen
nachname_reitkurs.
Verwenden Sie Ihren NACHNAMEN!
- Laden Sie die letzte Version Collection auf
github.comhoch.
21. Werkstatt
Erstellen Sie ein neues Repository auf github.com mit
dem Namen nachname_reparatur_checkgit.
Verwenden Sie Ihren NACHNAMEN!
Legen Sie die Klasse Reparatur an:
┏━━━━━━━━━━━━━━━━━━━━━━━━━━━━━━┓
┃          Reparatur           ┃
┣━━━━━━━━━━━━━━━━━━━━━━━━━━━━━━┫
┃ - arbeitsStunden: int        ┃
┃ - fahrzeug: String           ┃
┃ - mechaniker: String         ┃
┣━━━━━━━━━━━━━━━━━━━━━━━━━━━━━━┫
┃ + ...                        ┃
┗━━━━━━━━━━━━━━━━━━━━━━━━━━━━━━┛- Erstellen Sie einen Konflikt und lösen Sie diesen.
- Erstellen Sie mehrere Branches und führen Sie diese
wieder in
mainzusammen.
Erstellen Sie ein weiteres neues Repository auf
github.com mit dem Namen
nachname_reparatur.
Verwenden Sie Ihren NACHNAMEN!
- Laden Sie die letzte Version Collection auf
github.comhoch.
22. Supportfirma
Erstellen Sie ein neues Repository auf github.com mit
dem Namen nachname_supportauftrag_checkgit.
Verwenden Sie Ihren NACHNAMEN!
Legen Sie die Klasse SupportAuftrag an:
┏━━━━━━━━━━━━━━━━━━━━━━━━━━━━━━┓
┃        SupportAuftrag        ┃
┣━━━━━━━━━━━━━━━━━━━━━━━━━━━━━━┫
┃ - stunden: int               ┃
┃ - kunde: String              ┃
┃ - techniker: String          ┃
┣━━━━━━━━━━━━━━━━━━━━━━━━━━━━━━┫
┃ + ...                        ┃
┗━━━━━━━━━━━━━━━━━━━━━━━━━━━━━━┛- Erstellen Sie einen Konflikt und lösen Sie diesen.
- Erstellen Sie mehrere Branches und führen Sie diese
wieder in
mainzusammen.
Erstellen Sie ein weiteres neues Repository auf
github.com mit dem Namen
nachname_supportauftrag.
Verwenden Sie Ihren NACHNAMEN!
- Laden Sie die letzte Version Collection auf
github.comhoch.
23. Webagentur
Erstellen Sie ein neues Repository auf github.com mit
dem Namen nachname_webprojekt_checkgit.
Verwenden Sie Ihren NACHNAMEN!
Legen Sie die Klasse WebProjekt an:
┏━━━━━━━━━━━━━━━━━━━━━━━━━━━━━━┓
┃          WebProjekt          ┃
┣━━━━━━━━━━━━━━━━━━━━━━━━━━━━━━┫
┃ - stunden: int               ┃
┃ - projektName: String        ┃
┃ - entwickler: String         ┃
┣━━━━━━━━━━━━━━━━━━━━━━━━━━━━━━┫
┃ + ...                        ┃
┗━━━━━━━━━━━━━━━━━━━━━━━━━━━━━━┛- Erstellen Sie einen Konflikt und lösen Sie diesen.
- Erstellen Sie mehrere Branches und führen Sie diese
wieder in
mainzusammen.
Erstellen Sie ein weiteres neues Repository auf
github.com mit dem Namen
nachname_webprojekt.
Verwenden Sie Ihren NACHNAMEN!
- Laden Sie die letzte Version Collection auf
github.comhoch.
24. Druckerei
Erstellen Sie ein neues Repository auf github.com mit
dem Namen nachname_druckauftrag_checkgit.
Verwenden Sie Ihren NACHNAMEN!
Legen Sie die Klasse DruckAuftrag an:
┏━━━━━━━━━━━━━━━━━━━━━━━━━━━━━━┓
┃         DruckAuftrag         ┃
┣━━━━━━━━━━━━━━━━━━━━━━━━━━━━━━┫
┃ - anzahl: int                ┃
┃ - produkt: String            ┃
┃ - kunde: String              ┃
┣━━━━━━━━━━━━━━━━━━━━━━━━━━━━━━┫
┃ + ...                        ┃
┗━━━━━━━━━━━━━━━━━━━━━━━━━━━━━━┛- Erstellen Sie einen Konflikt und lösen Sie diesen.
- Erstellen Sie mehrere Branches und führen Sie diese
wieder in
mainzusammen.
Erstellen Sie ein weiteres neues Repository auf
github.com mit dem Namen
nachname_druckauftrag.
Verwenden Sie Ihren NACHNAMEN!
- Laden Sie die letzte Version Collection auf
github.comhoch.
25. CateringFirma
Erstellen Sie ein neues Repository auf github.com mit
dem Namen nachname_cateringauftrag_checkgit.
Verwenden Sie Ihren NACHNAMEN!
Legen Sie die Klasse CateringAuftrag an:
┏━━━━━━━━━━━━━━━━━━━━━━━━━━━━━━┓
┃       CateringAuftrag        ┃
┣━━━━━━━━━━━━━━━━━━━━━━━━━━━━━━┫
┃ - personen: int              ┃
┃ - veranstaltung: String      ┃
┃ - kunde: String              ┃
┣━━━━━━━━━━━━━━━━━━━━━━━━━━━━━━┫
┃ + ...                        ┃
┗━━━━━━━━━━━━━━━━━━━━━━━━━━━━━━┛- Erstellen Sie einen Konflikt und lösen Sie diesen.
- Erstellen Sie mehrere Branches und führen Sie diese
wieder in
mainzusammen.
Erstellen Sie ein weiteres neues Repository auf
github.com mit dem Namen
nachname_cateringauftrag.
Verwenden Sie Ihren NACHNAMEN!
- Laden Sie die letzte Version Collection auf
github.comhoch.
26. Veranstalter
Erstellen Sie ein neues Repository auf github.com mit
dem Namen nachname_event_checkgit.
Verwenden Sie Ihren NACHNAMEN!
Legen Sie die Klasse Event an:
┏━━━━━━━━━━━━━━━━━━━━━━━━━━━━━━┓
┃            Event             ┃
┣━━━━━━━━━━━━━━━━━━━━━━━━━━━━━━┫
┃ - teilnehmer: int            ┃
┃ - bezeichnung: String        ┃
┃ - veranstalter: String       ┃
┣━━━━━━━━━━━━━━━━━━━━━━━━━━━━━━┫
┃ + ...                        ┃
┗━━━━━━━━━━━━━━━━━━━━━━━━━━━━━━┛- Erstellen Sie einen Konflikt und lösen Sie diesen.
- Erstellen Sie mehrere Branches und führen Sie diese
wieder in
mainzusammen.
Erstellen Sie ein weiteres neues Repository auf
github.com mit dem Namen nachname_event.
Verwenden Sie Ihren NACHNAMEN!
- Laden Sie die letzte Version Collection auf
github.comhoch.
27. Bootsverleih
Erstellen Sie ein neues Repository auf github.com mit
dem Namen nachname_bootmiete_checkgit.
Verwenden Sie Ihren NACHNAMEN!
Legen Sie die Klasse BootMiete an:
┏━━━━━━━━━━━━━━━━━━━━━━━━━━━━━━┓
┃          BootMiete           ┃
┣━━━━━━━━━━━━━━━━━━━━━━━━━━━━━━┫
┃ - stunden: int               ┃
┃ - boot: String               ┃
┃ - kunde: String              ┃
┣━━━━━━━━━━━━━━━━━━━━━━━━━━━━━━┫
┃ + ...                        ┃
┗━━━━━━━━━━━━━━━━━━━━━━━━━━━━━━┛- Erstellen Sie einen Konflikt und lösen Sie diesen.
- Erstellen Sie mehrere Branches und führen Sie diese
wieder in
mainzusammen.
Erstellen Sie ein weiteres neues Repository auf
github.com mit dem Namen
nachname_bootmiete.
Verwenden Sie Ihren NACHNAMEN!
- Laden Sie die letzte Version Collection auf
github.comhoch.
28. Flugschule
Erstellen Sie ein neues Repository auf github.com mit
dem Namen nachname_flugunterricht_checkgit.
Verwenden Sie Ihren NACHNAMEN!
Legen Sie die Klasse FlugUnterricht an:
┏━━━━━━━━━━━━━━━━━━━━━━━━━━━━━━┓
┃        FlugUnterricht        ┃
┣━━━━━━━━━━━━━━━━━━━━━━━━━━━━━━┫
┃ - stunden: int               ┃
┃ - schueler: String           ┃
┃ - fluglehrer: String         ┃
┣━━━━━━━━━━━━━━━━━━━━━━━━━━━━━━┫
┃ + ...                        ┃
┗━━━━━━━━━━━━━━━━━━━━━━━━━━━━━━┛- Erstellen Sie einen Konflikt und lösen Sie diesen.
- Erstellen Sie mehrere Branches und führen Sie diese
wieder in
mainzusammen.
Erstellen Sie ein weiteres neues Repository auf
github.com mit dem Namen
nachname_flugunterricht.
Verwenden Sie Ihren NACHNAMEN!
- Laden Sie die letzte Version Collection auf
github.comhoch.
29. Kochschule
Erstellen Sie ein neues Repository auf github.com mit
dem Namen nachname_kochkurs_checkgit.
Verwenden Sie Ihren NACHNAMEN!
Legen Sie die Klasse KochKurs an:
┏━━━━━━━━━━━━━━━━━━━━━━━━━━━━━━┓
┃           KochKurs           ┃
┣━━━━━━━━━━━━━━━━━━━━━━━━━━━━━━┫
┃ - einheiten: int             ┃
┃ - bezeichnung: String        ┃
┃ - koch: String               ┃
┣━━━━━━━━━━━━━━━━━━━━━━━━━━━━━━┫
┃ + ...                        ┃
┗━━━━━━━━━━━━━━━━━━━━━━━━━━━━━━┛- Erstellen Sie einen Konflikt und lösen Sie diesen.
- Erstellen Sie mehrere Branches und führen Sie diese
wieder in
mainzusammen.
Erstellen Sie ein weiteres neues Repository auf
github.com mit dem Namen
nachname_kochkurs.
Verwenden Sie Ihren NACHNAMEN!
- Laden Sie die letzte Version Collection auf
github.comhoch.
30. Fahrschule
Erstellen Sie ein neues Repository auf github.com mit
dem Namen nachname_fahrausbildung_checkgit.
Verwenden Sie Ihren NACHNAMEN!
Legen Sie die Klasse FahrAusbildung an:
┏━━━━━━━━━━━━━━━━━━━━━━━━━━━━━━┓
┃        FahrAusbildung        ┃
┣━━━━━━━━━━━━━━━━━━━━━━━━━━━━━━┫
┃ - einheiten: int             ┃
┃ - schueler: String           ┃
┃ - fahrlehrer: String         ┃
┣━━━━━━━━━━━━━━━━━━━━━━━━━━━━━━┫
┃ + ...                        ┃
┗━━━━━━━━━━━━━━━━━━━━━━━━━━━━━━┛- Erstellen Sie einen Konflikt und lösen Sie diesen.
- Erstellen Sie mehrere Branches und führen Sie diese
wieder in
mainzusammen.
Erstellen Sie ein weiteres neues Repository auf
github.com mit dem Namen
nachname_fahrausbildung.
Verwenden Sie Ihren NACHNAMEN!
- Laden Sie die letzte Version Collection auf
github.comhoch.
Code-Dateien
| Dateiname | Aktion |
|---|---|
| CODECode_GIT_D.zip | Download |
Videos
| Dateiname | Aktion |
|---|---|
| VIDEOVideo_GIT_D | Abspielen |
Lernmaterialien
GIT
history
Git has a pretty interesting history because it was created out of necessity rather than as a commercial product.
Git was created in 2005 by Linus Torvalds, the creator of Linux. At the time, thousands of developers were contributing code to the Linux kernel, so they needed a good system for tracking changes and coordinating their work.
Before Git, the Linux project used a version-control system called BitKeeper. It worked well technically, but BitKeeper was proprietary software. For a while, the Linux developers were allowed to use it for free, but in 2005 that arrangement ended after a dispute.
Linus Torvalds therefore decided to create his own version-control system. His main goals were that it should be:
- very fast
- distributed, meaning every developer has a complete copy of the repository and its history
- able to handle large projects
- good at branching and merging
- resistant to corruption, using cryptographic hashes to identify data
He developed the first working version of Git extremely quickly—in roughly a couple of weeks in April 2005. Git was then used to manage the Linux kernel itself.
Soon afterward, Junio C Hamano became the main maintainer of Git, and he has played a major role in its development ever since.
Git gradually became popular beyond Linux. Services such as GitHub, launched in 2008, made Git much easier for developers to use collaboratively online. Later, platforms such as GitLab and Bitbucket also adopted Git.
One important distinction is:
Git = the version-control software installed on your computer.
GitHub = an online service that hosts Git repositories and adds features such as pull requests, issues, user accounts, and collaboration tools.
So the rough timeline is:
2002: Linux begins using BitKeeper
2005: BitKeeper arrangement ends → Linus Torvalds creates Git
2005 onward: Git becomes the Linux kernel’s version-control system
2008: GitHub launches
2010s onward: Git becomes the dominant version-control system for software development
The name “Git” was also deliberately a bit of a joke. In British English, git can mean an unpleasant or foolish person. Linus has joked that he names projects after himself—first Linux, then Git.
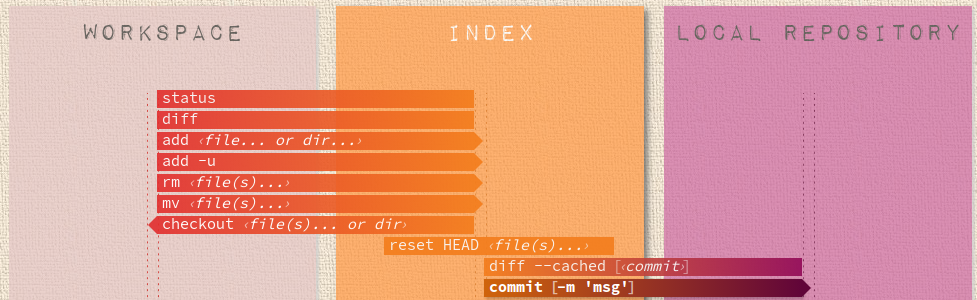
Areas
NDP Software :: Git Cheatsheet
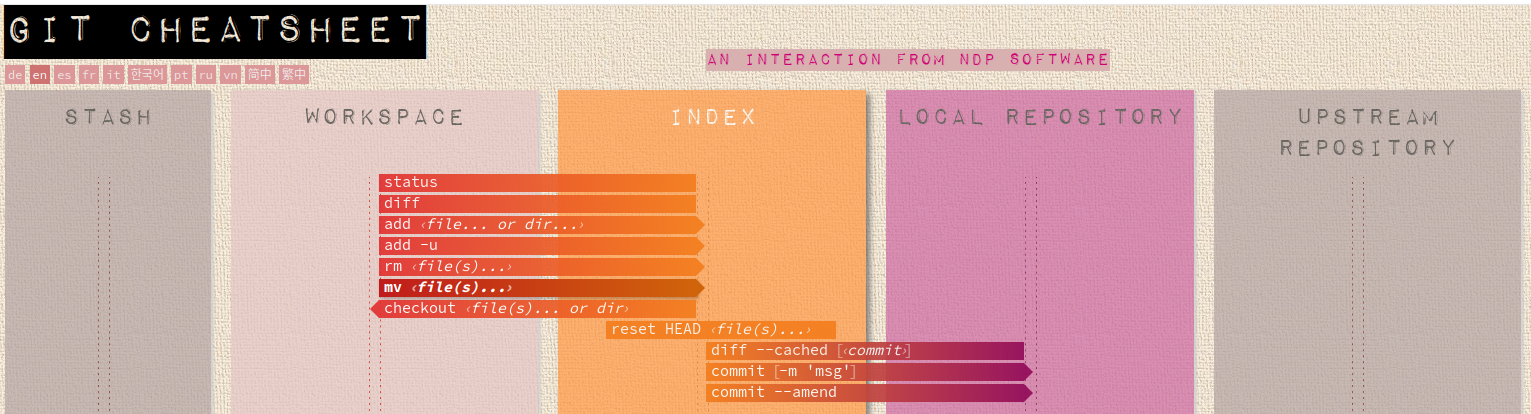
Definition:
Workspace / Working Directory: The workspace is the folder on your computer where the actual project files are located and where you actively work on them. These are the files you can open and edit in an editor such as VS Code or IntelliJ IDEA. For example, if you change
Main.java, that change first exists only in your working directory. Git notices that the file is different from the last committed version, but the change is not yet part of a commit. The workspace therefore represents the current state of your project files on your computer.Index / Staging Area: The index, also called the staging area, is an intermediate area between the working directory and the local repository. It is used to decide exactly which changes should be included in the next commit. When you run
git add Main.java, Git copies the current version of that file into the staging area. This is useful because you do not have to commit every changed file at once. You can select only the changes that belong together. You can think of the staging area as a preparation area for the next commit.Local Repository: The local repository is the Git database stored on your own computer, usually inside the hidden
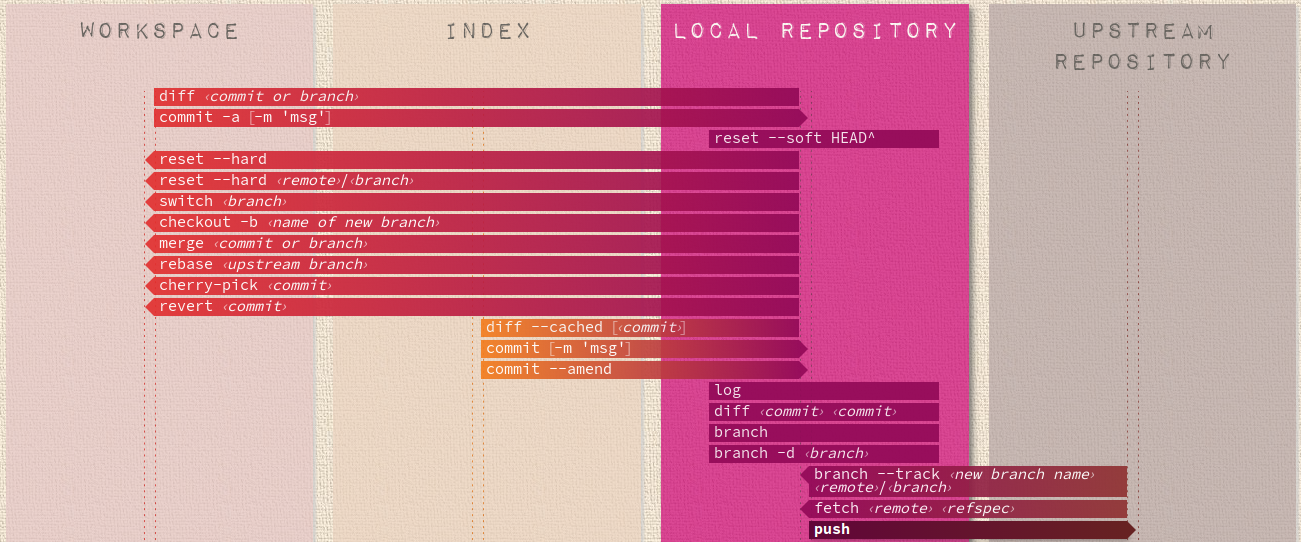
.gitfolder of your project. It contains the history of the repository, including commits, branches, tags, and other Git information. When you rungit commit, Git takes the changes currently stored in the staging area and saves them as a new commit in the local repository. At this point, the commit exists on your computer, but it has not necessarily been uploaded anywhere else yet. The local repository therefore contains your saved Git history on your own machine.Remote Repository: A remote repository is a Git repository stored on another computer or server. Common examples are repositories hosted on GitHub, GitLab, or Bitbucket. A remote repository allows several people to work on the same project and exchange commits. With
git push, you send commits from your local repository to the remote repository. Withgit fetchorgit pull, you receive changes from the remote repository. The remote repository is therefore a shared copy of the Git repository stored somewhere else.Upstream Repository: An upstream repository is usually the original repository from which your own repository was copied or forked. This is especially common in open-source projects. For example, imagine there is an original project at
github.com/company/project, and you create your own fork atgithub.com/yourname/project. Your own GitHub repository is usually calledorigin, while the original project can be configured asupstream. You can then download new changes from the original repository using commands such asgit fetch upstream. An upstream repository is therefore the original or main repository from which your repository receives changes.Stash is a temporary storage area for changes that you have made but do not want to commit yet.
Workspace
   |
   | git add
   v
Index / Staging Area
   |
   | git commit
   v
Local Repository
   |
   | git push
   v
Remote Repository
Remote Repository
|
| git fetch / git pull
v
Local Repository
|
| checkout / restore
v
Workspacefirst sample
remote repo
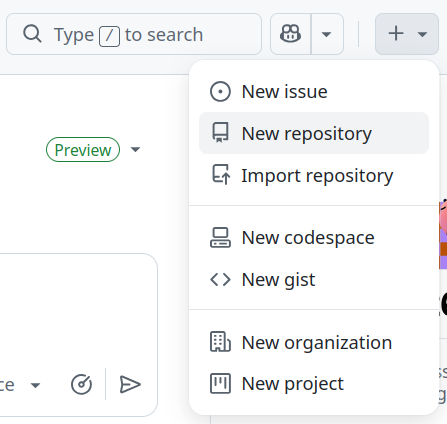
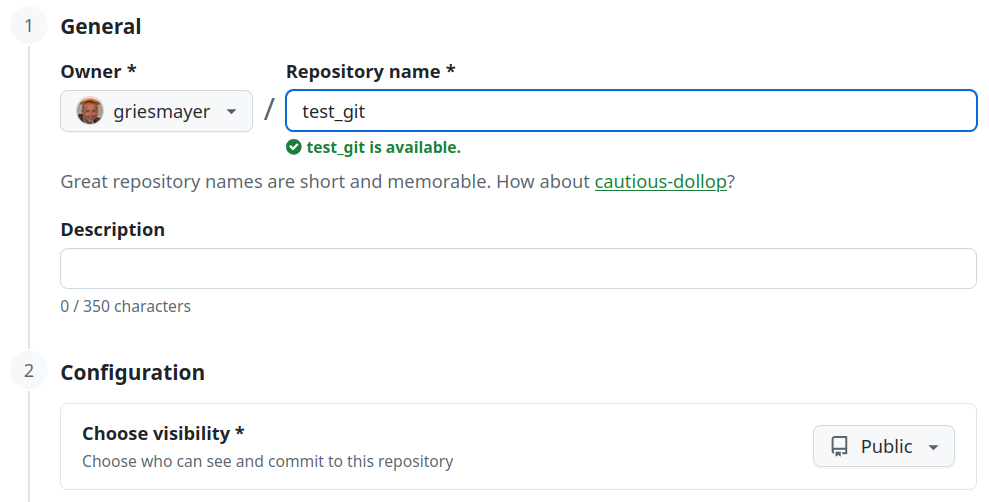
Local repository
git config --global user.name "Thomas Griesmayer"
git config --global user.email "griesmayer@spengergasse.at"

mkdir test_git
cd test_git/
git init
ls -l .git
git init initializes a new Git repository in the current
folder.
Git creates a hidden directory called:
.gitThis .git folder stores important Git information, such
as:
- commit history
- branches
- repository configuration
- information about the current project state
Workspace              → already exists
Index / Staging Area   → initialized by Git, but still empty
Local Repository       → created by git init (.git)
Remote Repository      → not affected
Staging area
edit Student.javaStudent.java
public class Student {
    String name;
}
git statusShows the current state of your Git working directory and staging area.
It tells you things like:
- which branch you are on
- which files were changed
- which files are staged for the next commit
- which files are modified but not staged
- which files are untracked
- whether your branch is ahead of or behind the remote branch
git add Student.java
ls -l .git
This adds the current version of Student.java to the
Index / Staging Area.
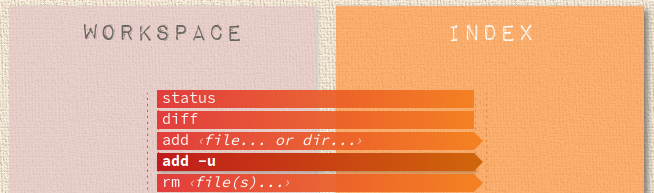
Local repository
git commit -m "Add Student class"
ls -l .git
This command creates a new commit in the local repository.
git commitTells Git to save the changes that are currently in the Index / Staging Area.-mStands for message."Add Student class"Is the commit message. It describes what was changed.
Remote repository
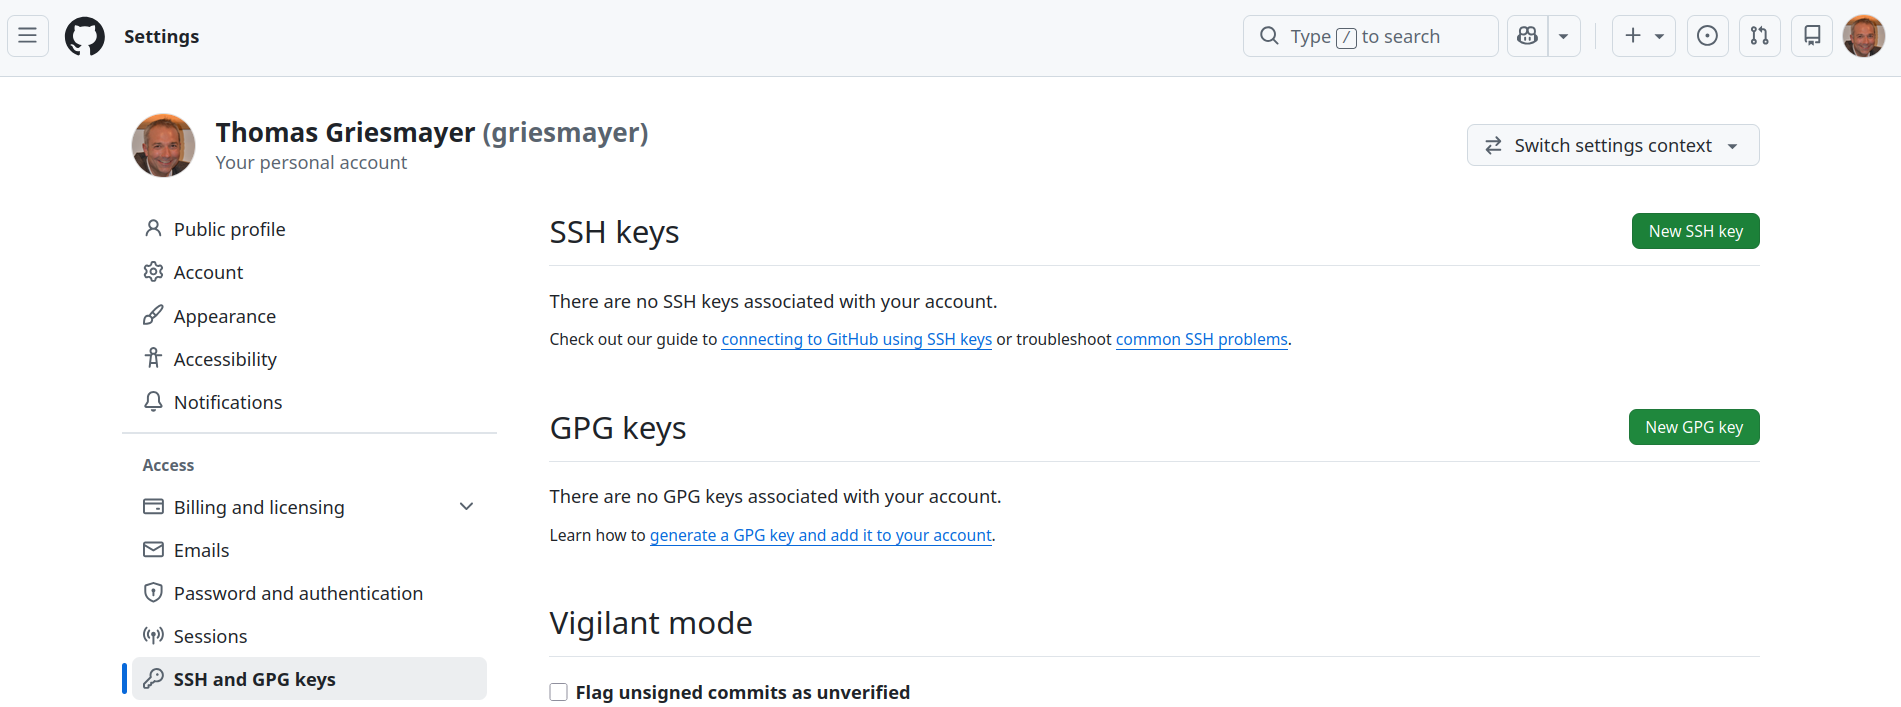
ssh key
An SSH key is a secure way to prove your identity to another computer or service, such as GitHub, without typing your password every time.
Keys:
The private key stays on your computer and must remain secret.
The public key can be uploaded to GitHub.
ssh-keygen -t ed25519 -C "griesmayer@spengergasse.at"ssh-keygen is the program used to create SSH keys.
-t means type. ed25519 is
the type of cryptographic key that should be created. It is a modern and
secure SSH key type.
-C means comment. The email address is
added as a label to the public key so that you can recognize which key
it is. It does not log you into GitHub, and it does not
have to be a password.
ls -l ~/.ssh
~/.ssh/id_ed25519
~/.ssh/id_ed25519.pub
ssh -T git@github.com
YES
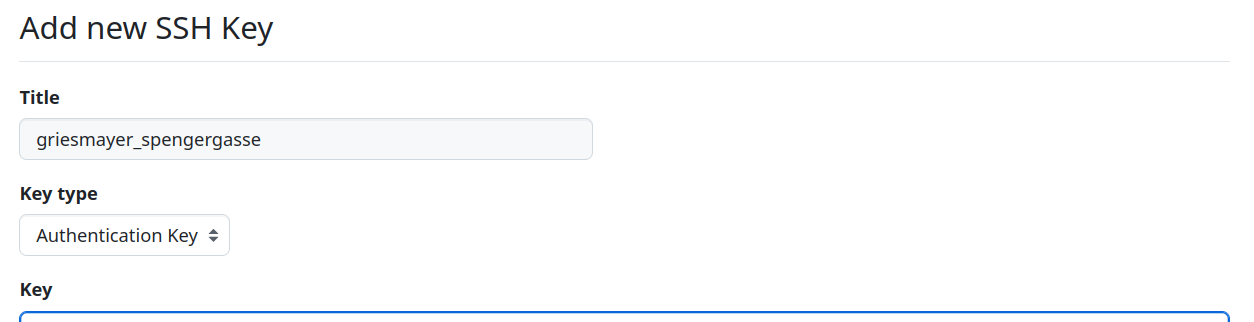
Hi griesmayer! You've successfully authenticated, but GitHub does not provide shell access.cat ~/.ssh/id_ed25519.pub
ssh-ed25519 AAAAC3NzaC1 griesmayer@spengergasse.atAdd to github.com
push
git remote add origin https://github.com/griesmayer/test_git.gitThis command connects your local Git repository to a remote repository on GitHub.
git remote Manages remote repositories.
add Adds a new remote connection.
origin is the name you give to the remote repository.
origin is just a conventional name. You could technically
choose another name, but origin is the standard.
https://github.com/griesmayer/test_git.git This is the
address of the GitHub repository.
git remote -vShows all remote repositories that are connected to your local Git repository.
Meaning:
origin→ the name of the remote repository- URL → the address of the repository on GitHub
(fetch)→ used when downloading changes(push)→ used when uploading changes
git push -u origin mainThis uploads your local main branch to the remote
repository called origin.
-u means set upstream.
From now on, connect my local
mainbranch withorigin/main.Now you can simple type:
git push
One important note: many newer repositories use main
instead of main.
macOS/Linux:
git config --local core.autocrlf inputWindows:
git config --local core.autocrlf trueConfigures how Git handles line endings in the current repository.
Different operating systems traditionally use different line endings:
<LF>Linux/macOS<CR><LF>Windows
Student.java (Windows):
public class Student { <CR><LF> } <CR><LF>
   |
   | git add / commit
   v
Student.java Repository:
public class Student { <LF> } <LF>
   |                                         |
   | checkout                                | checkout
   v                                         v
Student.java (Windows):                      Student.java (Linux):
public class Student { <CR><LF> } <CR><LF>   public class Student { <LF> } <<LF>
git config --listshows the Git configuration settings that are currently active.
Git uses configuration values for things such as:
- your name
- your email add
- the default branch name
- text editor
- merge settings
- remote-related behavior
Check

.gitignore
A .gitignore file tells Git which files
or folders it should ignore.
That means Git will not normally show those files as untracked and will not add them when you use:
git add .For example, a Java project might create compiled .class
files that you do not want to store in Git.
A .gitignore file could contain:
*.classIgnore all files that end with
.class.
You can also ignore whole folders:
out/
build/
.idea/
or specific files:
passwords.txt
config.local
Example:
project/
├── Main.java
├── Student.java
├── Main.class
├── .idea/
└── .gitignore
With this .gitignore:
*.class
.idea/
Git tracks:
Main.java
Student.java
.gitignore
but ignores:
Main.class
.idea/
A short definition is:
.gitignoreis a configuration file that specifies files and directories that Git should not track.
Important: .gitignore only affects files that are
not already tracked. If a file was already committed,
adding it to .gitignore does not automatically remove it
from Git.
gitignore.io - Create Useful .gitignore Files For Your Project
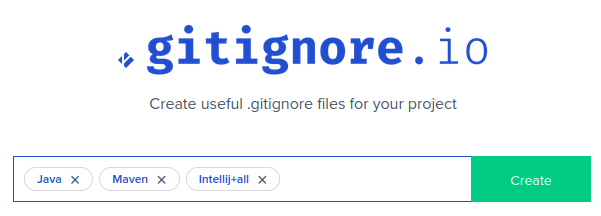
# Created by https://www.toptal.com/developers/gitignore/api/java,maven,intellij+all
# Edit at https://www.toptal.com/developers/gitignore?templates=java,maven,intellij+all

# User-specific stuff
.idea/**/workspace.xml
.idea/**/tasks.xml

# IntelliJ
out/

### Java ###
# Compiled class file
*.class
# Log file
*.log
# BlueJ files
*.ctxt
conflict
A Git conflict happens when Git tries to combine two different versions of the same part of a file and cannot decide automatically which version should be kept. This often happens when two developers change the same line, or nearby lines, in different ways.
For example, imagine a file originally contains
String name;. One developer changes it to
String fullName;, while another developer changes the same
line to String studentName;. When Git later tries to merge
these changes, it sees that both versions are different from the
original version. Git cannot know which change is correct, so it creates
a merge conflict.
Git then marks the conflicting part of the file and shows both
versions. The developer has to open the file, decide which version
should remain, or combine the two versions manually. After the conflict
has been resolved, the file is added again with git add,
and the merge is completed with a commit.
A conflict does not mean that Git is broken. It simply means that Git needs a human decision because the changes cannot be combined safely on their own. If two developers change different parts of the same file, Git can usually merge the changes automatically without a conflict.
Thomas
git clone https://github.com/griesmayer/test_git2.git thomas
cd thomas
git remote -v
git config --local user.name "Thomas"
git config --local user.email "thomas@spengergasse.at"
Susi
git clone https://github.com/griesmayer/test_git2.git susi
cd suis
git remote -v
git config --local user.name "Susi"
git config --local user.email "susi@spengergasse.at"
Thomas
git remote -v
vi Student.java
git status
git add Student.java
git status
git commit -m "add name property"
git status
git push
git status
Susi
vi Student.java
git status
git add Student.java
git status
git commit -m "add fullName property"
git status
git push

git pull
git merge
vi Student.java
git add Student.java
git commit -m "add fullName"
git push
git log --oneline --graph
branch
A branch in Git is a separate line of development within the same project. It allows you to work on changes without immediately affecting the main version of the project.
For example, the main branch may contain the stable
version of a program. If you want to develop a new feature, you can
create another branch, such as feature-login. You can then
make changes and commits on that branch while main remains
unchanged.
When the new feature is finished and tested, the branch can be merged
back into main. This makes branches useful for developing
new features, fixing bugs, experimenting with code, and allowing several
developers to work on different parts of a project at the same time.
Technically, a branch is a pointer to a commit. As you make new commits on that branch, the pointer moves forward to the newest commit.
A simple definition is:
Branch: A separate line of development in a Git repository that allows changes to be made independently from other branches.
main
The main branch is the primary branch of a Git repository.
It usually contains the main, stable version of the project.
For example:
A --- B --- C --- D
                  ↑
                 main
Here, main points to the newest commit
D.
When developers create other branches, they usually start from
main:
              feature
                 \
A --- B --- C --- D
                  ↑
                 main
After the work on the feature branch is finished and tested, it can
be merged back into main.
So a good definition is:
Main branch: The primary branch of a Git repository that usually contains the current stable or official version of the project.
Important: main is only a branch name.
other
We need other branches so people can work on changes without disturbing the main version of the project.
For example, suppose main contains a working
program:
A --- B --- C
            ↑
           main
Now you want to add a login feature. Instead of changing
main directly, you create a new branch:
A --- B --- C
            ↑
           main
            \
             D --- E
                   ↑
              feature-login
While you work on feature-login, the main
branch stays unchanged and stable.
Branches are useful because they let you:
- develop new features separately
- fix bugs without affecting other work
- experiment safely
- let several developers work at the same time
- review and test changes before merging them into
main
For example, a team might have:
main
 |
 +--- feature-login
 |
 +--- fix-payment
 |
 +--- new-design
When a branch is finished, it can be merged back into
main.
Git – Branch Example with Two Developers
Two developers, Thomas and Susi, work on the same Java project.
- Thomas creates a branch called
feature-ageand adds anageproperty. - Susi creates a branch called
feature-emailand adds anemailproperty. - Both developers push their branches to GitHub.
- Thomas merges
feature-ageintomain. - Susi merges
feature-emailintomain. - Both developers synchronize their repositories.
In this example, a merge conflict occurs because
both developers modify the same part of Student.java.
Create a GitHub repository
Create a new repository on github.com.
Repository name: test_branch
Select:
- Public
- Add a README file
- Default branch:
main
The repository address is:
https://github.com/griesmayer/test_branch.gitThomas – Clone the repository
Open a terminal.
git clone https://github.com/griesmayer/test_branch.git thomas
cd thomas

git config --local user.name "Thomas"
git config --local user.email "thomas@spengergasse.at"

git branch
git remote -v
git clone downloads the repository from GitHub.
git branch displays the local branches.
Expected output:
* maingit remote -v displays the remote repository.
Thomas – Create Student.java
vi Student.javaStudent.java:
public class Student {
    String name;
}
Commit and push the file:
git status
git add Student.java
git commit -m "add Student class"
git push origin main
The main branch now contains the Student
class.
Both developers will use this version as their starting point.
Susi – Clone the repository
Open a second terminal.
git clone https://github.com/griesmayer/test_branch.git susi
cd susi

git config --local user.name "Susi"
git config --local user.email "susi@spengergasse.at"

git branch
git remote -v
Susi now has the same version of Student.java as
Thomas.
Student.java:
public class Student {
    String name;
}
Both developers are currently working on main.
Thomas – Create feature-age
In Thomas’s terminal:
git switch -c feature-age
git branch
Expected output:
* feature-age
  main
git switch -c feature-age creates a new branch and
switches to it.
Thomas is now working on feature-age.
Modify Student.java
vi Student.javaStudent.java:
public class Student {
    String name;
    int age;
}
Commit and push
git status
git add Student.java
git commit -m "add age property"
git push -u origin feature-age
git push -u origin feature-age uploads the new branch to
GitHub and configures its upstream branch.
Thomas has now created a new branch on GitHub.
The main branch remains unchanged.
Susi – Create feature-email
In Susi’s terminal:
git switch -c feature-email
git branch
Expected output:
* feature-email
  main
Susi is now working on feature-email.
Modify Student.java
vi Student.javaStudent.java:
public class Student {
    String name;
    String email;
}
Commit and push
git status
git add Student.java
git commit -m "add email property"
git push -u origin feature-email
Susi has now created another branch on GitHub.
There are now three branches:
main
feature-age
feature-email
Each branch contains a different version of
Student.java.
main:
public class Student {
    String name;
}
feature-age:
public class Student {
    String name;
    int age;
}
feature-email:
public class Student {
    String name;
    String email;
}
Thomas – Merge feature-age into main
Thomas switches back to main.
git switch main
git branch
Expected output:
  feature-age
* main
Merge the branch
git merge feature-ageThis merges the changes from feature-age into
main.
Because main has not changed since the branch was
created, Git can perform a fast-forward merge.
Check Student.java
cat Student.javaOutput:
public class Student {
    String name;
    int age;
}
Push the changes
git push origin mainThe main branch on GitHub now contains the
age property.
Susi – Merge feature-email into main
Susi switches back to main.
git switch main
git pull origin main
git pull downloads Thomas’s changes and integrates them
into Susi’s local main branch.
Check Student.java
cat Student.javaOutput:
public class Student {
    String name;
    int age;
}
Susi now has the latest version of main.
Merge feature-email
git merge feature-emailBoth branches modified the same part of
Student.java.
Git cannot automatically determine how to combine the changes.
A merge conflict occurs.
Expected output includes:
Auto-merging Student.java
CONFLICT (content): Merge conflict in Student.java
Automatic merge failed; fix conflicts and then commit the result.
Check the status
git statusGit reports that Student.java contains an unresolved
conflict.
Open Student.java
vi Student.javaThe file contains conflict markers similar to:
public class Student {
    String name;
<<<<<<< HEAD
    int age;
=======
    String email;
>>>>>>> feature-email
}
The conflict markers indicate:
<<<<<<< HEAD– the current branch (main)=======– separates the two versions>>>>>>> feature-email– the incoming branch
Git requires the developer to resolve the conflict manually.
Resolve the conflict
Susi decides to keep both properties.
Edit Student.java:
public class Student {
    String name;
    int age;
    String email;
}
Remove all conflict markers.
Complete the merge
git add Student.java
git commit -m "merge feature-email into main"
git push origin main
The merge is now complete.
The main branch contains both properties.
Thomas – Update his repository
Thomas downloads the latest changes from GitHub.
git switch main
git pull origin main
Check Student.java
cat Student.javaOutput:
public class Student {
    String name;
    int age;
    String email;
}
Both developers now have the same version of the project on
main.
Display the Git history
Thomas:
git fetch origin
git log --oneline --graph --all --decorate
The history will look similar to:
*   M (HEAD -> main, origin/main) merge feature-email into main
|\
| * B (origin/feature-email) add email property
* | A (feature-age, origin/feature-age) add age property
|/
* C add Student class
* D Initial commit
The graph shows:
- Both feature branches started from the same commit.
- Thomas committed his changes to
feature-age. - Susi committed her changes to
feature-email. - Thomas merged
feature-ageintomain. - Susi merged
feature-emailintomain. - The final merge commit combines both changes.
The letters represent example commit identifiers.
Delete the feature branches
After merging, the feature branches are no longer needed.
Thomas
Delete the local branch:
git branch -d feature-ageDelete the remote branch:
git push origin --delete feature-ageSusi
Make sure Susi is on main:
git switch mainDelete the local branch:
git branch -d feature-emailDelete the remote branch:
git push origin --delete feature-emailCheck the remaining branches
git fetch --prune
git branch -a
Expected output:
* main
  remotes/origin/HEAD -> origin/main
  remotes/origin/main
Only the main branch remains.
Git – Structure of a Good Commit Message
A good commit message explains what was changed and why the change was necessary.
A commit message should follow this structure:
Short summary of the changes (about 50 characters)

Detailed description explaining what was changed
and why the change was necessary.

Additional information if needed.

- First important change
- Second important change

Issues: #123

Signed-off-by: Name <email@example.com>
Guidelines
- Subject line: Write a short, meaningful summary of approximately 50 characters.
- Blank line: Separate the subject line from the description with an empty line.
- Description: Explain what was changed and why. Wrap lines at approximately 72 characters.
- Bullet points: Use bullet points to describe multiple changes if necessary.
- Issues: Reference related issues or tickets if applicable.
- Signed-off-by: Include your name and email address if required by the project.
Example
Add age validation to Student class

Prevent invalid age values from being stored in
Student objects.

- Reject negative age values
- Display an error message for invalid input
- Add JUnit tests for age validation

Issues: #15
Create a Commit
For a short commit message:
git add Student.java
git commit -m "Add age validation to Student class"
For a detailed commit message:
git add Student.java
git commit
Git opens the configured text editor, where you can enter the complete commit message.
Important
- Use the imperative mood:
Add,Fix,Remove,Updateinstead ofAdded,Fixed,Removed. - Keep the subject line short and descriptive.
- Explain why a change was made, not just what was changed.
- Avoid meaningless messages such as
Update,Changes, orFix. - The description, issue reference, and
Signed-off-byline are optional unless required by the project.
Reference: Chris Beams – How to Write a Git Commit Message
Important Git commands
Git Commands – Overview
The following Git commands were used in the examples for repositories, conflicts, and branches.
| Git Command | Description |
|---|---|
git init |
Creates a new local Git repository. |
git clone <url> |
Downloads a repository from a remote server. |
git clone <url> <folder> |
Clones a repository into a specified folder. |
git config --global user.name "Name" |
Sets the username for all local repositories. |
git config --global user.email "Email" |
Sets the email address for all local repositories. |
git config --local user.name "Name" |
Sets the username for the current repository. |
git config --local user.email "Email" |
Sets the email address for the current repository. |
git config --list |
Displays the current Git configuration. |
git status |
Shows modified, staged, and untracked files. |
git add <file> |
Adds a file to the staging area. |
git add . |
Adds all changes in the current directory and its subdirectories to the staging area. |
git commit -m "Message" |
Saves staged changes in the local repository. |
git remote add origin <url> |
Connects a local repository to a remote repository. |
git remote -v |
Displays configured remote repositories. |
git push |
Uploads commits to the configured upstream branch. |
git push origin main |
Uploads the local main branch to GitHub. |
git push -u origin main |
Uploads main and sets its upstream branch. |
git pull |
Downloads and integrates changes from the upstream branch. |
git pull origin main |
Downloads and integrates changes from origin/main. |
git fetch origin |
Downloads remote changes without merging them. |
git fetch --prune |
Downloads remote updates and removes obsolete remote-tracking references. |
git branch |
Lists all local branches. |
git branch -a |
Lists local and remote-tracking branches. |
git branch <name> |
Creates a new branch without switching to it. |
git switch <name> |
Switches to an existing branch. |
git switch -c <name> |
Creates a new branch and switches to it. |
git merge <name> |
Merges the specified branch into the current branch. |
git push -u origin <branch> |
Uploads a branch and configures its upstream branch. |
git branch -d <name> |
Deletes a local branch if it has been merged. |
git push origin --delete <name> |
Deletes a branch from the remote repository. |
git log --oneline --graph |
Displays the commit history as a compact graph. |
git log --oneline --graph --all |
Displays the history of all local and remote-tracking branches. |
git log --oneline --graph --all --decorate |
Displays the commit graph with branch names and references. |
Important Git Options
| Option | Description |
|---|---|
-m |
Specifies a commit message. |
-u |
Sets the upstream branch for future push and pull operations. |
-c |
Creates a branch when used with git switch. |
-d |
Deletes a local branch if safely merged. |
-a |
Displays all branches when used with git branch. |
-v |
Displays remote URLs when used with git remote. |
--local |
Applies a configuration setting to the current repository. |
--global |
Applies a configuration setting to the current user. |
--delete |
Deletes a remote branch when used with git push. |
--prune |
Removes obsolete remote-tracking references during fetch. |
--oneline |
Displays each commit on a single line. |
--graph |
Displays the commit history as a graph. |
--all |
Includes all references in the commit history. |
--decorate |
Displays branch names and other references next to commits. |